
This post will show you how to build a picnic table exactly like the one shown in the photo below. I think this picnic table would make a wonderful addition to your outdoor summer experience at home. When correctly built and finished you will be able to enjoy this woodworking project for many years to come. I built mine using everyday woodworking tools that could be bought very cheaply second hand or borrowed from a neighbour. I used plans that I downloaded and were essential when it came time to build my picnic table. Just follow the step by step guide below and it will teach you everything you need to know about building a picnic table.

You can make this picnic table, just keep reading!
Step 1: Materials list and tools used
The materials used were bought at my local hardware store quite cheaply:- 2x4s
- 2x6s
- 2x8s
- 3" x 3/8" galvanised carriage bolts
- 2 1/2", 3" and 4" inch decking screws
- Outdoor wood varnish
- Circular saw
- Sabre saw
- 3m tape measure
- Framing square
- Combination square
- Cordless drill and an assortment of bits
- C-clamps and bar clamps
- Ratchet set
- Paint brushes
- Safety specs
- 120 and 220 grit sandpaper
Terminology used in the guide

Step 2: Cutting the legs to length
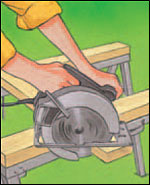
Cut the legs to length using a circular saw. Clamp your framing square at 60 degrees to the end of the 2x8 and use this as a fence to run your circular saw against to ensure a perfect 60 degrees. Obviously, you need to do this 8 times.
Step 3: Cutting the table slats
Cut the table slats to length from a 2x8. The top edges of the slats may be rounded off using a router or giving a light run with a smoothing plane.
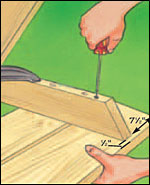
Step 3: Prepare the end table and centre table supports
This involves cutting a 60 degree angle on the ends of the supports. This cuts down on weight slightly and makes for a more 'knee friendly' table.
Step 4: Creating the picnic table top

The table top assembly requires the two
end table supports and the centre table
support. Spacers are used in between the slats, during assembly, to allow a space between the slats for rainwater drainage while maintaining a practical table
surface.
Drill pilot holes, 2 for each slat on both end table supports and the centre support. Countersink the holes so that the screw head finishes flush with the bottom surface of the supports.
Screw the supports to the table slats. You may use a wood glue if desire for extra rigidity.
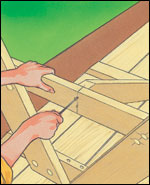
Step 5: Attaching the legs
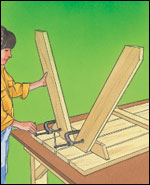
Clamp the legs in place and position them on each of the centre slats and on the outer face of the end support faces. The legs will be attached with some galvanised carriage bolts with washers. It is very important to use galvanised elements as they resist corrosion and ensure that your table will be held together securely.
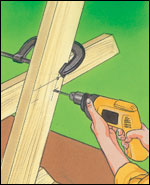
 Drill some clearance holes for the bolts. It is a good idea to drill clearance holes which are very slightly smaller than the bolt diameter. This will make for a very rigid leg structure. The bolts will be tightened from the inside. The counterboring ensures that the end of the bolt does not protrude underneath the table and possibly injure somebody while sitting. Also, ensure that you use a galvanised washer. This will spread the load applied when tightening the bolt and minimise any puncturing of the wood and prevent any ingress of water into the timber, which will result in premature rotting of the wood. You can plug the counterbore with some clear silicone after you have finished tightening the bolts.
Step 6: Attaching the bench supports to the legs
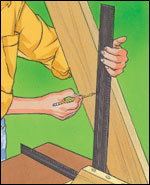 Mark the position of the bench support and clamp to the legs using a c-clamp. Mark the position of the holes. Using deck screws and a cordless screwdriver attach the bench supports.
Step 7: Cut and attach the braces
Using 2x4s cut the braces to length and cut
60 degree angles on both ends. Centre
the brace on the bench support and drill
pilot holes for the decking screws.
Step 8: Cut the bench cleats and attach
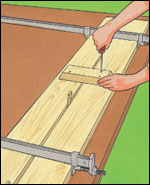 Use spacers to space out the bench slats and fix the bench slats together using the bench cleat. Clamp the assembly together usingbar clamps. Drill pilot holes and fix using decking screws. For extra strength you may choose to use two bench cleats.
Step 9: Fix the bench to the bench support
 Position the benches onto the bench supports and hold them in place using the c-clamps. See the position guides in the diagram
Drill pilot holes on the underside of the
bench supports. Attach the benches to the
bench supports using decking screws.
Step 10: Sand and finish
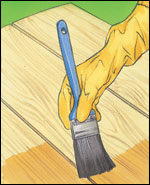 Using a sanding block and some 120 grit paper give the surfaces a sanding. Sand in the direction of the grain to give a smoother finish. If you are in a hurry then may choose not to sand on the surfaces that are not visible. Using a vacuum cleaner suck all the dust off the surfaces. Using 220 grit sandpaper, sand again. This should leave a smooth surface. Again vacuum the surface and rub all surfaces with a tack cloth. Note: A tack cloth is a lint free cloth that has been impregnated with a wax that will grab all bits of dust from your woodworking project. If you want to stain the wood I would recommend using a pre-conditioner if you have built your picnic table from pine. The pre-conditioner helps softwoods like pine to stain more evenly. Once the picnic table has been dusted you may apply a coat of outdoor varnish. Allow to dry for 24 hours.
Conclusion:
I hope that you have enjoyed this project. It can be easily done over a weekend and will last for years to come. If you need some blueprints. I bought a very good set of plans online.


0 komentar:
Posting Komentar